
How To Fix The Front-End Alignment On A Car At Home
If you could name one thing that you consider an extension of your personality & your biggest asset, we are positive you would point at your car.
Cars are our companions and do more than just taking us from point A to point B. They are functional and aesthetic at the same time. Doesn’t something that’s so important for you deserve care and maintenance? Of course! It deserves a lot of attention to keep giving you the performance you look for. To help you with this, we are going to tackle the most common issue in cars – alignment. It may seem like nothing, but the alignment on a car directly affects its performance. One seriously cannot expect one’s car to be at its best when the alignment is bonkers! So, it is important to understand the reasons behind this and how we can fix it. Let’s start.
What are the signs of incorrect wheel alignment?
You don’t need a list of signs to figure out that your car needs an alignment. You will know the moment you start driving and the car starts pulling on one side of the road or the other. Uneven tire wear and a shaky or crooked steering wheel will
A brief about alignment
There are 3 main types of alignment: Four-wheel, thrust, and front-end. The type of alignment you need will depend on the problem you are facing. Sometimes, a front-end alignment is enough while some other times, all your wheels will need adjustments. Front-end alignment is the most common problem, which we shall focus on today.
How to perform a front-end alignment
Let’s walk through the entire process, one step after the other:
1. Grab your car’s repair manual
Before you start doing anything, it is crucial that you understand your car and know its specifications. Your vehicle’s repair manual is your Bible for this. Go through it to check the right alignment measurements. You will see what the ideal toe-in and toe-out measurements should be based on which you will be able to decide how to measure the alignment and how to fix it. You will also understand the camber or vertical angle of your wheels.
2. Gather all your tools
If you look around, you will find multiple tools and ways to fix the alignment. There are also many different kits that you can pick from and follow the instructions given. Our method is among the easiest and doesn’t require too many materials either. You will only need the following:
- Measuring tape (2)
- Bricks (2)
- Jack
- Angle iron (2 pieces of 24 inches each)
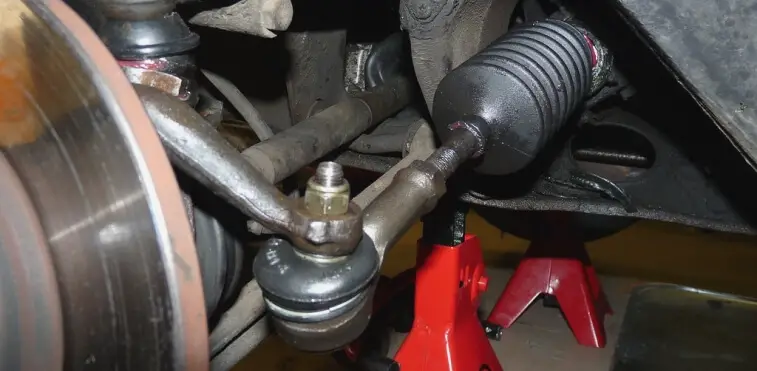
3. Work on the tie rod
You will find the tie rod between the two front tires. This rod connects the steering wheel and the tires. This rod is the reason why you can move your tires with the steering wheel. If you are not sure where this is, please refer the manual again. It will tell you exactly where to find it. Now, just loosen the nuts that are holding it in place. There should be two nuts. You don’t need to remove them completely. Just loosening them enough to work with them is good enough.
4. Adjust the right angles
With the car in neutral, move/push it forward and backward. This will bring your car back in the right angles. It will adjust the alignment properly, and the driving suspension will change. After this, turn the steering wheel to adjust it until it is straight. Here, you should use your experience and feel to determine where it is the straightest. You can also take the help of a partner to measure the rods on each side of the tie rod. They should both measure the same.
5. Measure the wheels with a measuring tape
On each side of the front tires, place a brick. Then put an angle iron on each of these bricks. The flat side should be against the tire. Use the tape measures to measure the angles from the front of one tire to the front of the other, and back of one tire to the back of the other. You can do this by sealing the metal end on the angle iron and stretching the tape measure over it.
6. Adjust accordingly
Note down the measurements on the tape measure and crosscheck them with the ones mentioned in the manual. When you do this, you will understand how much you have to adjust and in which direction. If your tires need to be turned inwards, the rod should be moved in the clockwise direction and vice-versa. This may need a few trials before you find the sweet spot. Once you are satisfied, you can remove all the tools, tighten the nuts on the tie rod, and get ready to roll.
7. Perform a test drive
Now that you are done, we are sure you are tempted to go on a long drive to experience the improvement. But, we recommend a test first. Drive a short distance before making any plans. Test the alignment and pay attention to the steering wheel. If you see any differences or anomalies, you should go back home and readjust. Once you are completely satisfied, you can gear up for a sweet ride!
To wrap it all up
While fixing basic issues is pretty easy, if you have never done this before or if you are unable to adjust despite attempts, we advise you to head to a mechanic and let him/her take care of the alignment. Mechanics, being experienced in this field, will be able to help you out in no time. Granted, that’s a few extra bucks, but it is totally worth it. The same holds true for other types of alignment, which may be a little too difficult for a DIY project.
All the best!

Author Bio
Hi, I am Mary Williams. I have a keen interest in technology-related content; I love reading and researching what’s new in tech. I also like writing articles related to automotive, gardening, science and much more. I like to write an in-detail article after thorough research. If not writing you will find me trying different adventure sports and travelling the world with my camera.