
How and When to Replace Brake Rotors
Most motorists understand the need to perform routine maintenance to keep their cars in good running condition. If you own a car, you know pretty well that some parts require regular maintenance more often than others.
This involves regularly changing oil, keeping proper tire pressure to prevent tire wear, as well as inspecting fluid levels in your car. When it comes to checking the braking system of your car, you not only need to inspect its brake fluid and brake pads but also check the rotors.
Understanding brake rotors
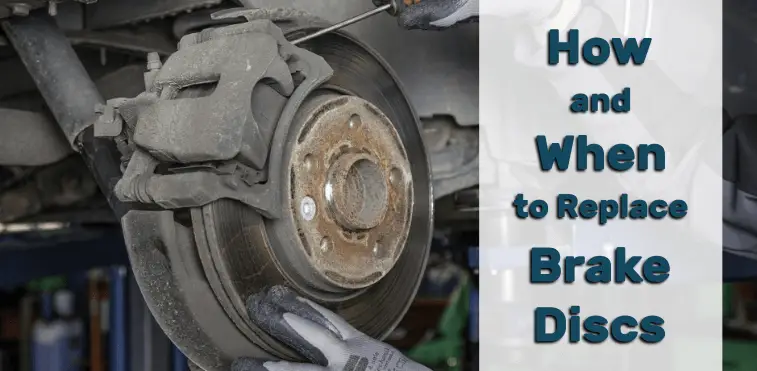
Rotors, also known as brake discs, are essential components of the braking system of your car. It is what the brake pads apply pressure to so as to stop the wheels from spinning.
Rotors are as important as brake pads but last longer than the brake pads. They should be checked from time to time because they are subject to heat that causes them to wear out and start deforming. Excessive rusting may also be a problem on vehicles that aren’t driven on a daily basis, which is why it’s important to use car protection covers regularly.
Composition of brake discs
Most brake discs are made of cast iron, while others are made of composite components such as carbon or ceramic matrix metals. As we speak, there are multiple kinds of discs available in the market, but those we install the most are the high-quality zinc-coated rotors since they help fight off surface rust.
How and when to replace brake discs
You know it is the right time to change your rotors when you feel pulsing or vibration when applying the brakes, as well as a blue discoloration on the rotor surface. Hot spots or grooves on rotors may also cause this pulsation. At this point, you should not even bother getting them repaired. Instead, you should get them replaced.
If your vehicle is equipped with rear brake drums, check out this post to learn how to remove brake drums at home.
How to replace the brake rotors
Tools you will need
- Caliper spreading tool or C-clamp
- Bungee cords or a thick wire
- Torque wrench
- Basic hand tools
- Repair manual
- Brake cleaner
- WD40 or any other penetrating solvent
- Breaker bar
- Thread locker
- Brake pad lubricant
- Anti-seize lubricant
Step-by-step instructions
Step 1: Loosen the nuts and jack up your car. Make sure you secure it with wheel stops and jack stands as well.
Step 2: Next, remove the wheel nuts and then take off the wheels.
Step 3: Unbolt the brake caliper fasteners at the back of the caliper. Always start with the base bolts to make the work easier when removing brake pads. Take out the pads, and then remove the upper caliper fastener. Use WD-40 if the bolts are hard to remove.

Step 4: Unbolt the calipers from the knuckle. Use a breaker bar to loosen the fasteners if needed. Always use the penetrating spray if the bolts are corroded or rusted.
Step 5: Remove your calipers from the disc and hang them on the car using a thick wire/bungee cord. Don’t let the calipers swing by the brake hoses to prevent any risk of damaging the brake lines.
Step 6: Next, take off the rotors. If they don’t come out, loosen them with a hammer. Once removed, add lubricant (anti-seize) on the axle hub.
Step 7: After ensuring your new rotor is of the same size as the old one, clean the front and rear sides with a brake cleaner spray. This will take off any residue.
Step 8: Use a C-clamp to compress the caliper piston back so as to glide back on the discs.
Step 9: Put the calipers back on the disc. Add some removable thread locker on the knuckle bolts to ensure that they stay locked. Always refer to your repair manual to make sure you torque the bolts as required.
Step 10: Grease the caliper pins before sliding them back. This will allow your new caliper, as well as brakes, to function well. Never use an anti-seize compound on the caliper pins. The anti-seize compound reacts with rubber and will cause the pins to seize in the caliper.
Step 11: Inspect your brake fluid level, add some brake fluid to the reservoir, and inspect the brake pedal for proper operation.
Step 12: Reinstall your wheels and torque your wheel nuts using a torque wrench. Test the brakes before hitting the road.

- Photo credit: hawktools.co.uk
Always pump the brake pedal before moving the car, as you may need to fully depress the pedal a couple of times before the brake system is operational again.
Last Words
When it comes to changing brake discs, every vehicle is different depending on the driver’s habits and manufacturer’s standards. However, the need for rotor replacement is best determined by proper inspection.
If your car starts wobbling or the brakes begin screeching, squeaking, or squealing, it’s high time you inspect the entire braking system, including the brake rotors. With the aid of the tools mentioned above, you can easily replace your brake discs right at home and save a lot of money. The whole process is supposed to take you at most 90 minutes.
![]()
About the author:

Alice is the founder behind the automotivebros. She is described as a car repair helper, money saver, and advice giver when it comes to the automobile industry. Automotivebros gives the best automotive products and repair posts that are straightforward and share her expertise in a manner that is easy to understand. Readers definitely are in for a unique and fun reading experience when they visit automotivebros.